
This presentation page features a lesson module that came about as part of the effort to convert a class from a traditional instructor-led physical classroom to an entirely asynchronous version that would be accessible 24 hours a day and be as engaging and as relevant to the learner’s purpose as possible.
There are actually two classes and both classes are visual communications courses that center around branding. In one course they are branding themselves, and in the more advanced course, they are branding a business.
We use Adobe Photoshop, Illustrator, InDesign, and Dimension to create a visual brand in each class. It is never difficult to convince learners/students of the benefits of having a degree of proficiency with these software programs. These programs are among the most widely used design software solutions in a great number of industries.
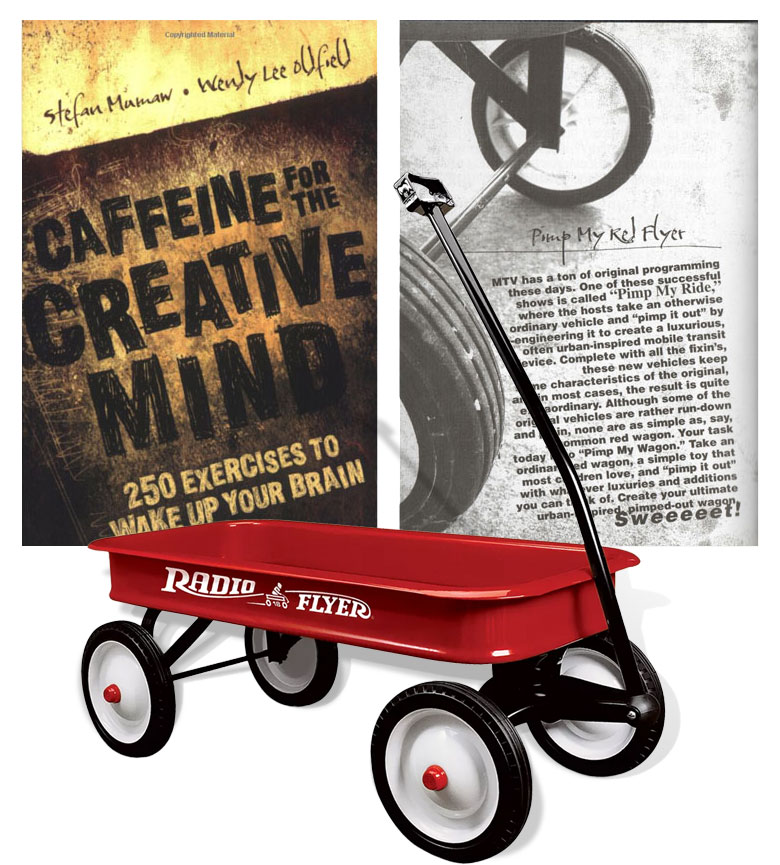
The Red Flyer eLearning module, (PMRF) uses all of these programs except InDesign.
The images below show us four variations of the wagon project. Click or tap a wagon image below to view more detailed images in a lightbox slide-show ↓
There are four images total for each of the examples shown below. They are 'encapsulated' within a slide show which can be accessed by clicking or tapping one of the wagon images below.
Standard documentation for an instructional module of this type starts with project thumbnails and storyboards. The docs list for this project is not complicated, but each item is a critical component of the module support and development package;
The Story Boards for Learning Modules will look quite differently depending on the project subject matter and nature of the training or instruction. A module built for instructor led training in a classroom is of course, quite different from an entirely asynchronous block of training. The storyboards for a title 9 training module will (again), look quite different from the story boards that were created for this software centric, project-based module.


Each of the boards above correspond to an instructional video that will never be longer than 12 to 15 minutes in length. Each of the videos are noted and organized by the specific activities associated with that segment of instruction, and 'bullet-pointed' on each story board as well. It should again be noted that the boards are created based upon the direction of the activities for that instructional segment. Each segment is designed as a vehicle for completing the activities that define or make up that segment. Please click or tap any one of the story board images above to see them in better detail, thank you!


Select Tool Detail
When we see any of the tools on the tool bar having this little ‘arrow’ in the bottom right-hand corner, this means that there are additional options for this tool.
Clicking and holding those tools will reveal the other options. This is a traditional user interface convention we see from many software providers!
*Note that only the Hand tool has no additional options.
The first thing that should be noted here is that the PMRF exercise does not use any of the additional tool options. The project eLearning module will show all Dimension's tools, tool modes and options in detailed fashion as is shown in the example below.
Select tool details
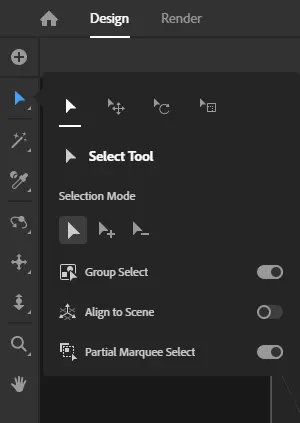
There are four select options and are shown above - they are; Select, Group Select, (just like Illustrator), Align to Scene, and Partial Marquee Select.
There are three select modes that are also just like Adobe Illustrator. Those are;


Like Illustrator, (again), the cursor will change when the Select mode changes. Those changes are shown in the Select tool details image above ↑
The vehicle used to drive this effort is provided by Google Forms. This platform provides (built-in) data analysis tools as well as security measures for a safe online area of interaction. Here is a look at that Google Form;

The intended result of users/learners interacting with this form is that they will not only have a bird's eye view of what the micro-project entails, but they will also have an opportunity to self-evaluate their personal skill level in a way that they perhaps have not previously had. In addition to that, being concise with the preassessment tool makes it easier for the end-user/learner to complete.
The images below demonstrate the data using conventional and easy-to-read charts. The initial chart will show the names of the users and the dates and times they interacted with the preassessment mechanism.

The survey questions are returned as text and also as a pie chart, as shown in the example images below ↓


While this survey is relatively small in scope, it quickly provides critical information to the instructor or course delvery specialist that they can then use to the benefit of the learners/students/end-users participating in the micro-project. Determining where the greatest need[s] are at is important for the instructor to be as effective as is possible.
As an experienced instructional designer with considerable experience as an instructor also, I find that performance objectives must be created for each learner/participant according to their skillset and experience. How the performance objectives or rubric is applied depends upon the setting for the delivery and the goals of the learner/participant.
The primary goal of this module is to generate engagment and interest in design software and 3D in particular. Making learning FUN is not a concrete science, but it can make a significant difference to the learner when learning is FUN! One of the reasons I advocate for 3D artists and students is that the software teaches us so much more than polygons and vertices. We learn about cameras and light and then of course there are the polygons and vertices...
To determine one's personal success or level thereof, we need to simply look at the work. If it makes you, the artist happy, well, that's an A plus. The video instructions are the principle tools participants will use to create their success with this micro-project. Those instructions provide a step-by-step path to some measure of success, guaranteed!

The post activity assessment is embedded in the the instructional site that this page is featuring/covering.

finis


